Join to Get Help, Report Bugs, or Just Chat!
Introduction
Mobile Legends: Adventure is a game centered around gaining rewards while idle. However, there is still much to do, such as manage heroes, beat levels, collect rewards, and more. The BotSauce Mobile Legends: Adventure bot is here to take the tedious grinding out of the game, and provide you with high level heroes and rewards! Mobile Legends: Adventure bot provides many features to enhance your game experience and make the game even more enjoyable.
Features
For a full list of supported features, click here:
Prerequisites
Bot Setup
Step 1 - Select Device to Bot
Once you open BotSauce, select the device that you want to run the bot on.
Make sure that you are running BotSauce as admin because not running in admin CAN cause issues!
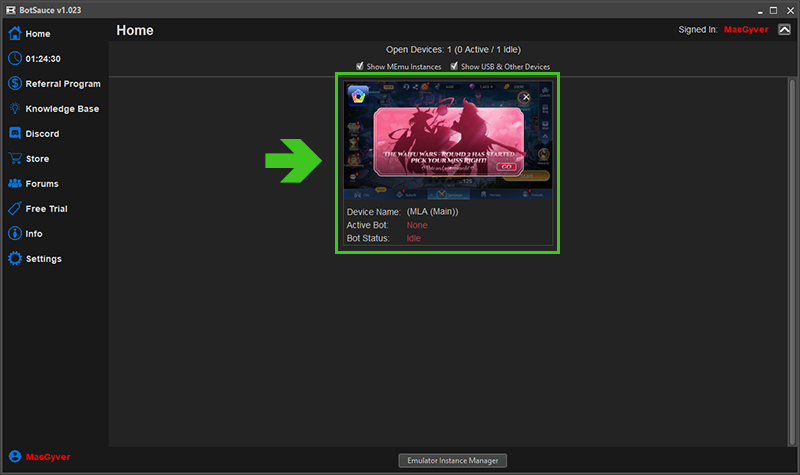
Step 2 - Select Mobile Legends Adventure Bot
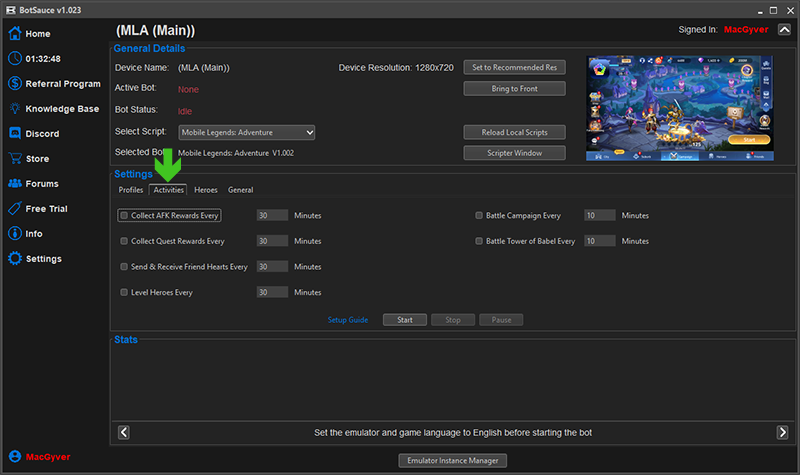
After selecting the device that you want to bot, you will then select "Mobile Legends: Adventure" from the "Select Bot" drop down menu. You should then see the Mobile Legends: Adventure settings panel, like this.

Step 3 - Enable Activities
The next step is to enable the activities that you want the bot to perform. To do this, select the "Activities" tab.
Here's a short description for each of the activities:
- Collect AFK Rewards: This will collect AFK rewards every x minutes specified by the user
- Collect Quest Rewards: This will collect Quest rewards every x minutes specified by the user
- Send & Receive Friend Hearts: Sends and received friend hearts every x minutes specified by the user
- Level Heroes: This will level up and/or equip gear for the specified heroes (described in the next step) every x minutes specified by the user
- Battle Campaign: This will battle campaign stages every x minutes specified by the user
- Battle Tower of Babel: This will battle tower of babel every x minutes specified by the user
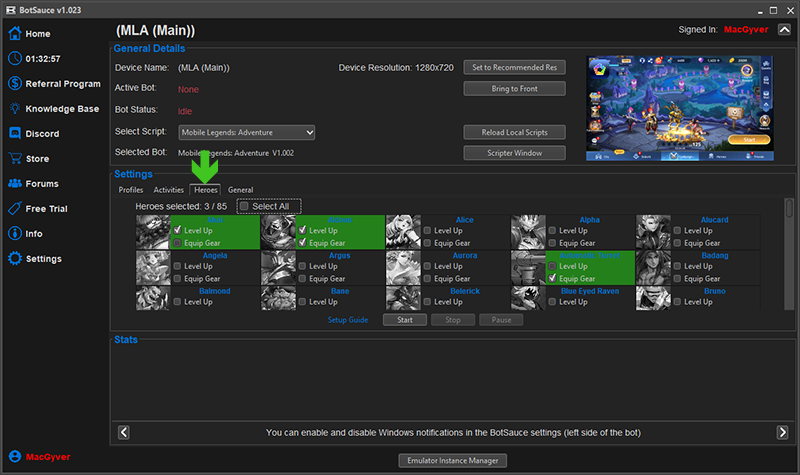
Step 4 - Select Heroes to Level and Equip Gear
If you have enabled the "Level Heroes" activity, you will need to configure which heroes you want to level and equip gear for. To do this, select the "Heroes" tab. From there, select the checkbox for each hero that you want the bot to manage for you. The number of selected heroes will be visible at the top of the heroes list.
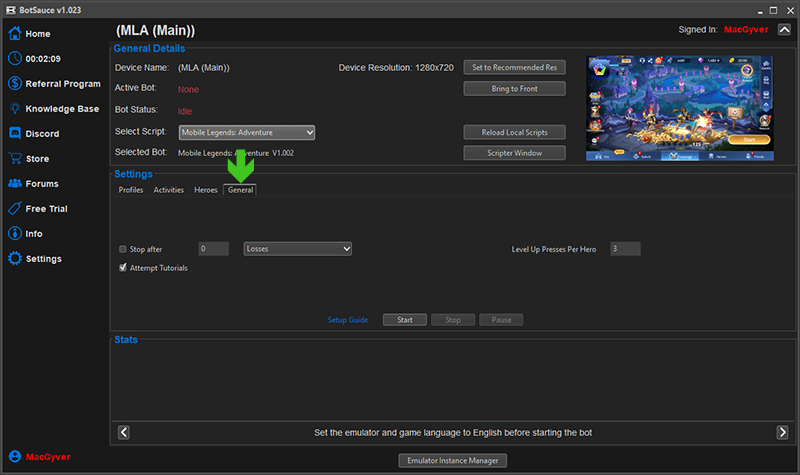
Step 5 - General Configuration
The last configuration step is the "General" tab. Select this tab to see the remaining settings. Here is a short description of each setting.
Stop After
This is a setting that can be enabled to prevent the bot from going if you continue losing over and over, or if you want to stop after a certain number of wins or total battles. You can simply set the numeric value to stop at, and then select a option from the drop down. For example, if you input "5" and select "Losses" then the bot would stop if you lose 5 battles.
Attempt Tutorials
If enabled, the bot will attempt to complete the in game tutorials. Some tutorials are more complex, or require user input. In those cases, the bot may stop, or ask the user for input. However, in general it will handle most in game tutorials.
Level Up Presses Per Hero
This value is how many times the "Level Up" button will be pressed per hero that you have selected for the bot to manage. For example, if you tell the bot to manage "Wanwan" ever 30 minutes, and set this value to 5, then every 30 minutes, the bot will press the "Level up" button in game 5 times for Wanwan. This is a good setting to allow for user selection on how hard to level up heroes. You can set it to 1 for a light resource expenditure, or a higher value like 20 to dump resources more quickly into heroes.
Step 6 - Save a Profile
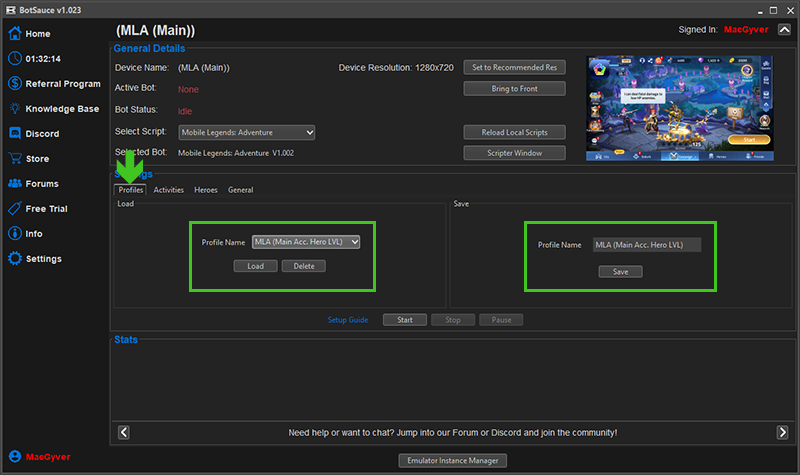
Now that you configured all of your settings, save them for later! You can easily save a settings profile to load back in later. That way you don't have to keep setting up the same options over and over. To do this, open the "Profiles" tab. In there, enter a "Profile Name" on the right hand side, and then press "Save".
Now you should see the saved profile in the left hand side "Load" drop down box. Now in the future, you don't have to set any settings. When you open the bot, simply select the profile from the "Load" drop down box, and then press the "Load" button. All settings will be loaded exactly as you set them. You can save as many profiles as you need, which is especially useful when botting multiple accounts.
Step 7 - Start the Bot
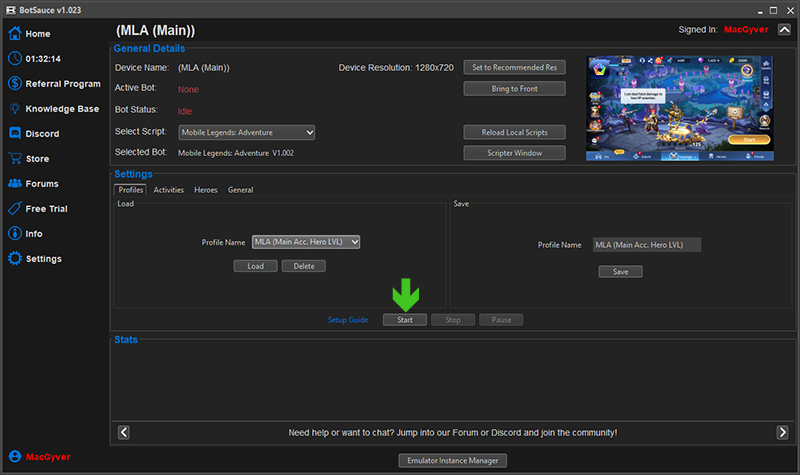
That's all there is to it, now press the "Start" button and happy botting!
Useful Links
- FAQ
- Complete BotSauce Getting Started Guide
- Setup & Installation Guide - BotSauce
- Setup & Installation Guide - BlueStacks
- Setup & Installation Guide - MEmu
- Setup & Installation Guide - USB Devices
- How to Report a Bug
-
 2
2

 to expand the block manager.
Recommended Comments
Join the conversation
You can post now and register later. If you have an account, sign in now to post with your account.