

Introduction
BlueStacks is an Android emulator that allows you to run Android applications on your computer. Bluestacks can run the game, and BotSauce will then interact with it in order to function. There are multiple emulators that we support, BlueStacks is just one of them.
BotSauce is also capable of supporting other emulators, such as MEmu, as well as physical USB devices connected to your computer. If you want to use another emulator, or a physical USB device, then you do not need to follow this BlueStacks setup and installation guide. Instead follow one of these guides:
- If you wish to use MEmu, follow our MEmu setup and installation guide by clicking here
- If you wish to use a physical android device connected via USB, follow our USB setup and installation guide by clicking here
Prerequisites
What's Next?
BlueStacks Setup & Installation
![]() Windows
Windows
Step 1 - Download BlueStacks Installer
You can download the latest BlueStacks installer from here:
Step 2 - Install BlueStacks
After downloading the installer, simply run it and go through all installation steps like any other installer.
For the official BlueStacks install guide, click here:
Step 3 - Ensure that Hardware Virtualization is Enabled
BlueStacks (and android emulators in general) will work without hardware virtualization however, everything will be extremely slow and laggy. It is extremely recommended to enable hardware virtualization on your computer before moving forward. You can do this step last if you want. Try to run an emulator without it enabled, and then enable it. You will notice a significant increase in performance and wonder why you didn't just do it in the first place! To enable hardware virtualization, see the official BlueStacks guide:
How to enable Hardware Virtualization [Important]
Step 4 - Setup Your BlueStacks Instances
Follow the BlueStacks guide here to setup and configure BlueStacks instances:
https://support.bluestacks.com/hc/en-us/articles/360013435912-Multi-Instance-Manager-on-BlueStacks-4
Important: When creating new instances, make sure not to use "Large virtual address". If you are having issues with the bot detecting your BlueStacks instance, try making a new instance with a different android version. Currently we recommend using "32 bit Nougat".
Step 5 - Install Games on BlueStacks Instances
Now you need to install the game that you wish to play. Follow the guide here:
https://support.bluestacks.com/hc/en-us/articles/360033360412-How-to-install-an-app-on-BlueStacks-4
Note: You can save yourself a step later if you create your instance with "Landscape" and resolution set to "1280x720" during the BlueStacks instance creation process.
Step 6 - Configure BlueStacks Instances for BotSauce
Now that your BlueStacks instances are all setup, we just need to make sure a few settings are set correctly then we are ready to go!
In the BlueStacks instance that you want to bot on, open the settings window.
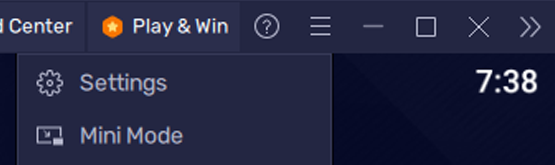
There are 2 important settings that need to be correct for BotSauce to work properly with BlueStacks.
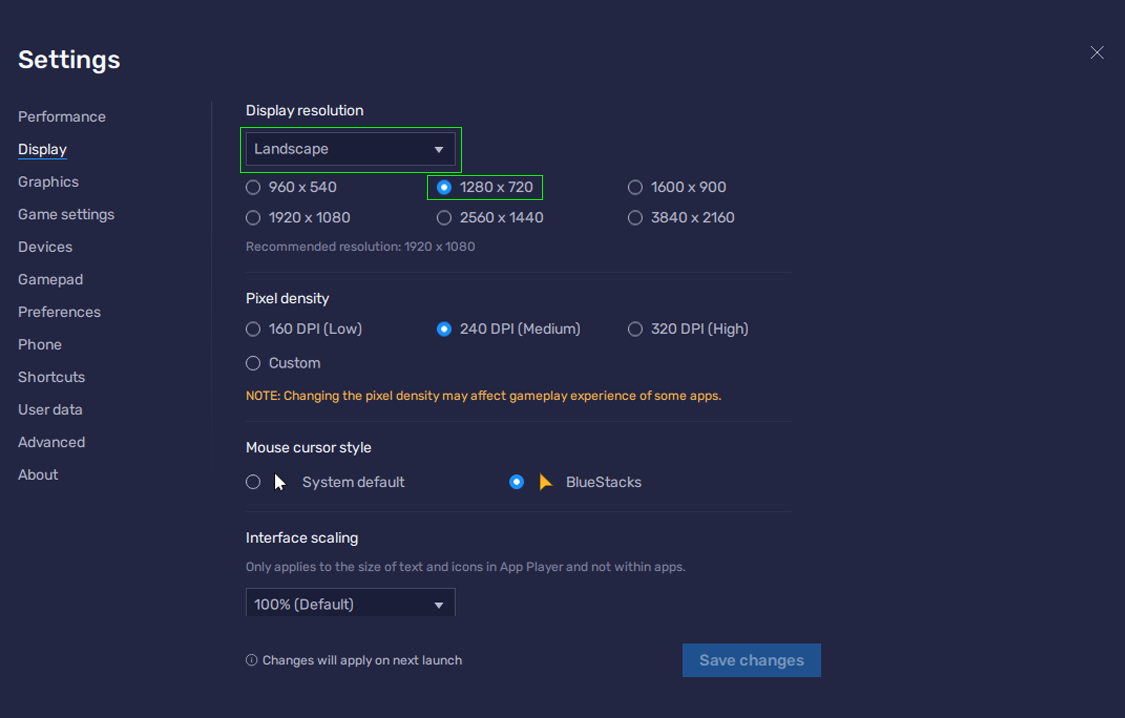
1. Display -> Resolution
Set to "Landscape" and "1280x720". Then press Save. When prompted, you may need to restart the emulator.
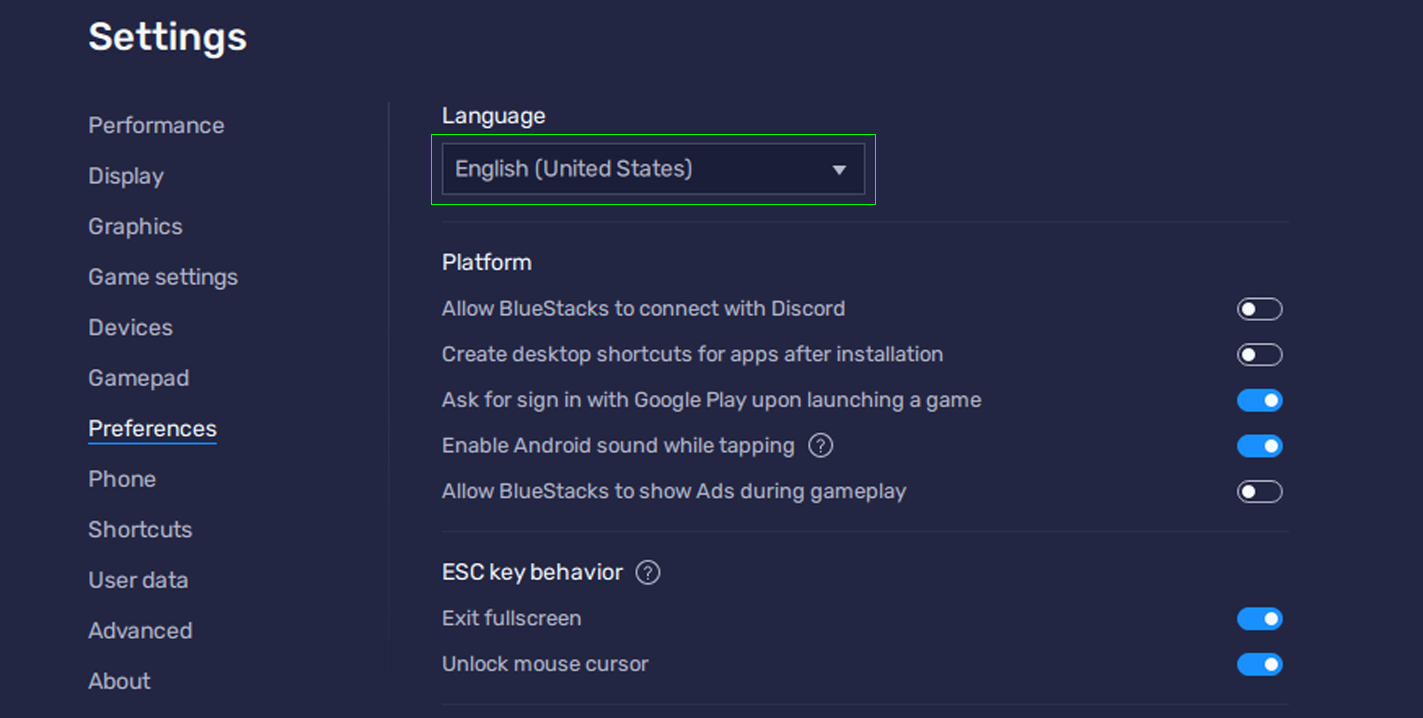
2. Preferences -> Language = English
Make sure that your emulator language is set to English for the bot to work properly.
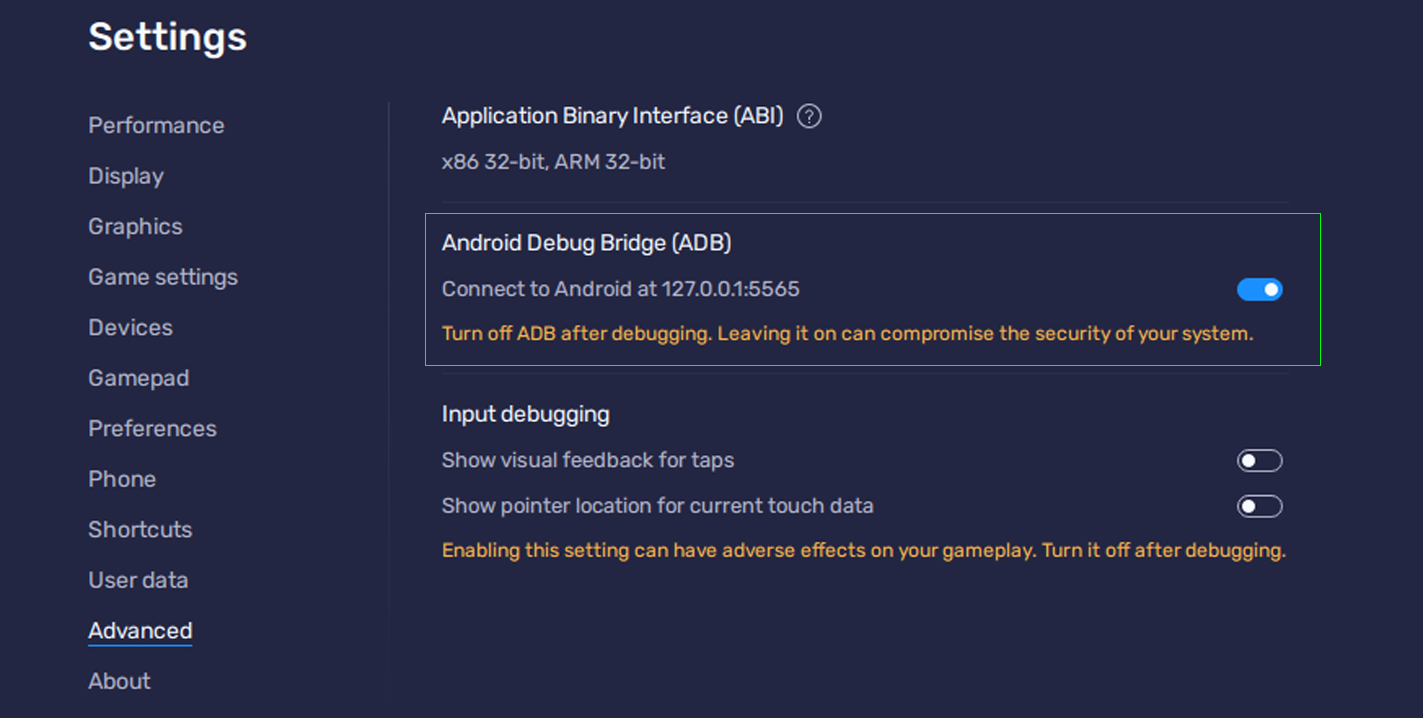
3. Preferences -> Enable Android Debug Bridge (ADB)
Make sure this is enabled.
Important: After enabling ADB, you may need to restart the BlueStacks instance and or BotSauce in order for the new BlueStacks instance to be detected in BotSauce! You only need to do this the first time you enable ADB, after that it will work normally.
Step 7 - BlueStacks Setup Complete!
Now you should be able to run your BlueStacks instance, and open the installed application/game.
![]() Mac
Mac
Step 1 - Download BlueStacks Installer
You can download the latest BlueStacks installer from here:
Step 2 - Install BlueStacks
After downloading the installer, simply run it and go through all installation steps like any other Mac installer.
For the official BlueStacks install guide, click here:
Step 3 - Ensure that Hardware Virtualization is Enabled
BlueStacks (and android emulators in general) will work without hardware virtualization however, everything will be extremely slow and laggy. It is extremely recommended to enable hardware virtualization on your computer before moving forward. You can do this step last if you want. Try to run an emulator without it enabled, and then enable it. You will notice a significant increase in performance and wonder why you didn't just do it in the first place! To enable hardware virtualization, see the official BlueStacks guide:
How to enable Hardware Virtualization [Important]
Step 4 - Setup Your BlueStacks Instances
At the time of writing this guide, BlueStacks does not support multi instance manager on Mac. This is a windows only feature. For Mac, simply open the BlueStacks application.
Step 5 - Install Games on BlueStacks Instances
Now you need to install the game that you wish to play. Follow the guide here:
https://support.bluestacks.com/hc/en-us/articles/360033360412-How-to-install-an-app-on-BlueStacks-4
Step 6 - Configure BlueStacks Instances for BotSauce
Now that your BlueStacks instances are all setup, we just need to make sure a few settings are set correctly then we are ready to go!
In the BlueStacks instance that you want to bot on, open the preferences window.
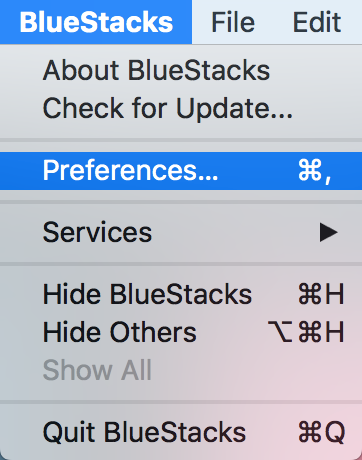
There are 2 important settings that need to be correct for BotSauce to work properly with BlueStacks.
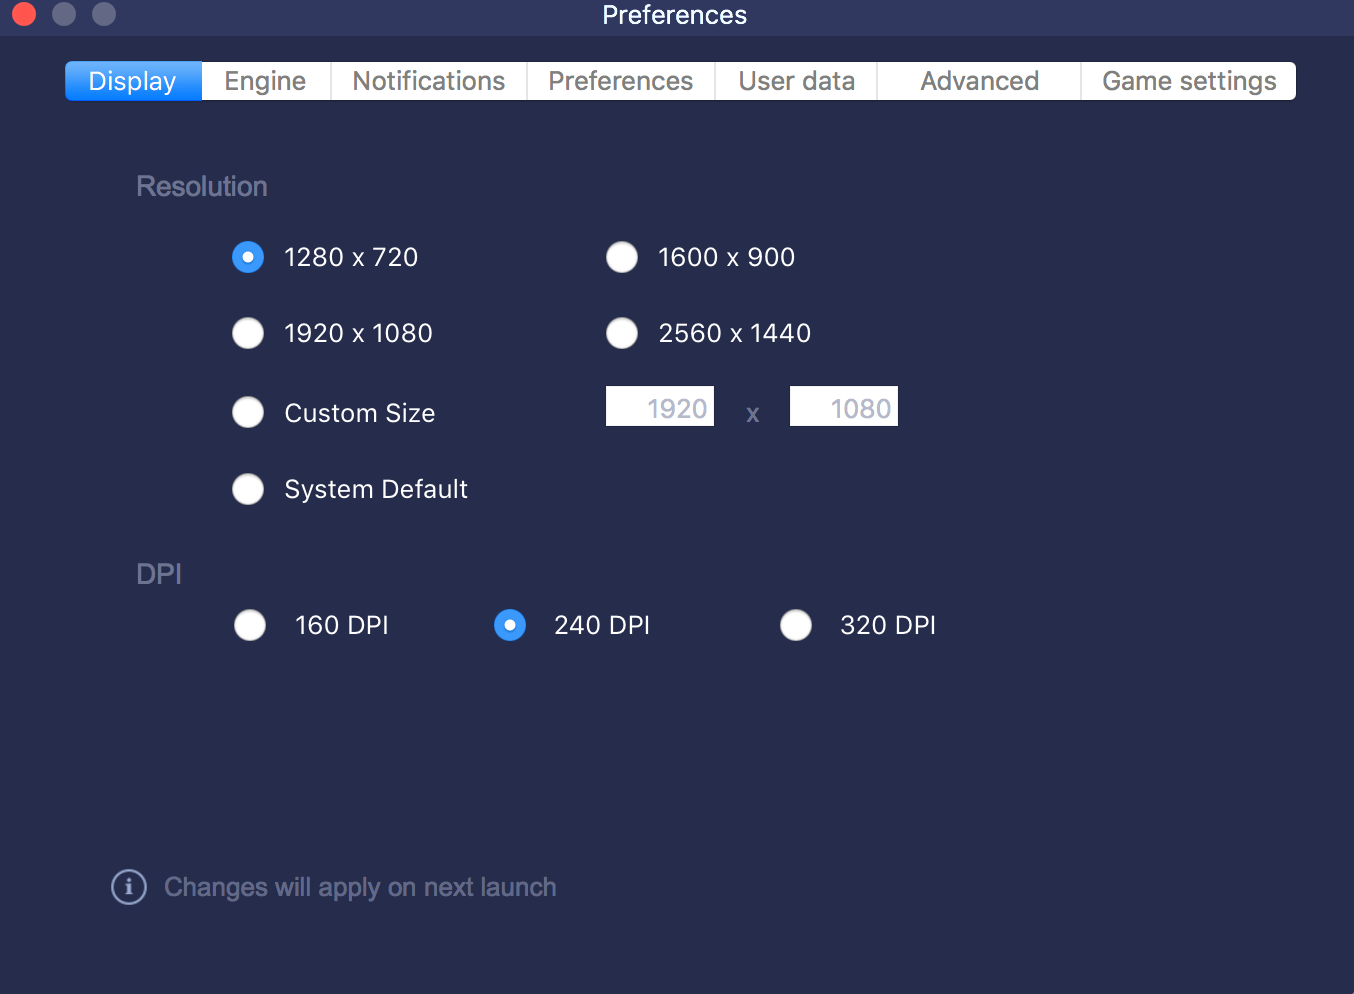
1. Display -> Resolution
Set to "1280x720" and 240 DPI. Then press Save. When prompted, you may need to restart the emulator.
2. Preferences -> Language = English
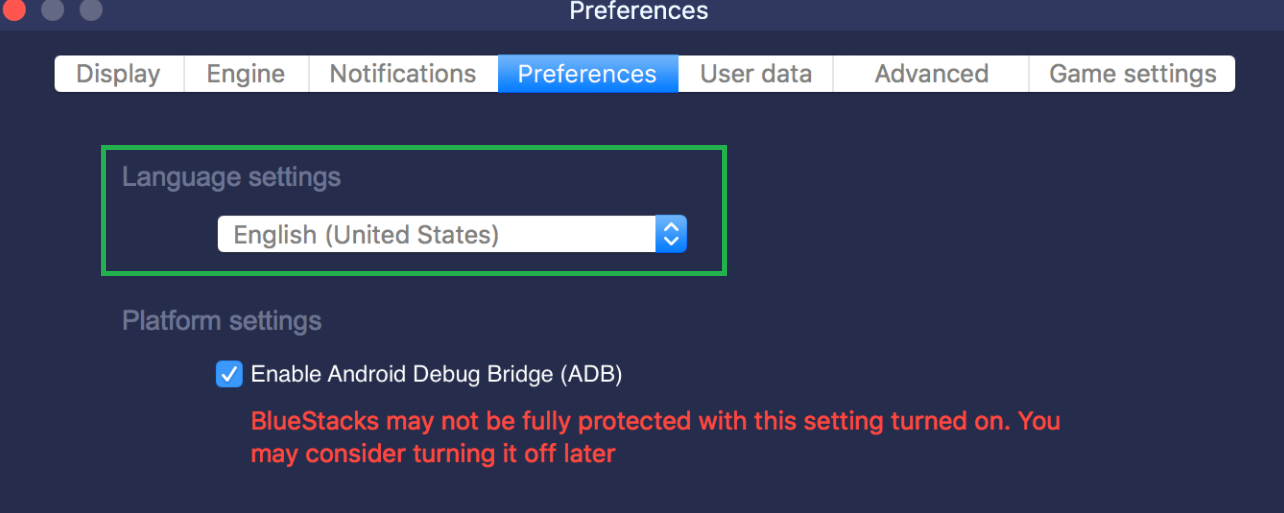
3. Preferences -> Enable Android Debug Bridge (ADB)
Make sure this is enabled.
Important: After enabling ADB, you may need to restart the BlueStacks instance and or BotSauce in order for the new BlueStacks instance to be detected in BotSauce! You only need to do this the first time you enable ADB, after that it will work normally.
Step 7 - BlueStacks Setup Complete!
Now you should be able to run your BlueStacks instance, and open the installed application/game.
Troubleshooting
If you're having issues using BlueStacks after following the above steps, check the FAQ here:
https://botsauce.org/forum/faq/4-bluestacks/
Recommended Comments
There are no comments to display.
Join the conversation
You can post now and register later. If you have an account, sign in now to post with your account.